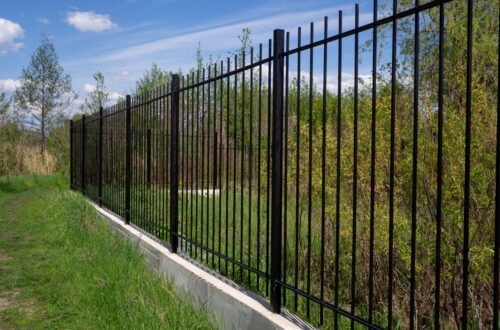
Ah, the majestic gates that guard our homes, welcoming guests and keeping intruders at bay. Whether you’re swinging open an iron gate to reveal a secret garden or pushing a button to let your automatic gate do the talking, one thing’s for sure: those gates deserve some love and attention. In this guide, we’ll dive into the world of gate cleaning and steel and iron gate maintenance, ensuring that your entrance remains a sight to behold.
The Importance of Regular Gate Maintenance
Before we embark on this gate-cleaning adventure, it’s essential to understand why regular maintenance matters. Your gate isn’t just a pretty face; it’s a functional piece of your property that requires attention to keep it performing optimally.
Neglecting manual and driveway gate maintenance can lead to a variety of issues, including:
- Rust formation on steel and iron gates.
- Hinges and moving parts become stiff or squeaky.
- Accumulation of dirt and grime, affecting the gate’s appearance.
- Potential damage to electrical components for automatic gates.
- Increased wear and tear, leading to costly repairs.
Now that we’ve stressed the importance of maintaining your gate, let’s gather our tools and materials.
Tools and Materials You’ll Need
Before we embark on our mission to restore your steel or iron gate to its former glory, it’s crucial to gather the essential tools and materials that will be your trusty companions in this endeavor. Here’s what you’ll need no matter the type of gate you have:

Soapy Water
Your first line of defense against the accumulated grime and dirt on your gate is soapy water. It’s like sending in the troops to battle those stubborn stains and spots.
White Vinegar
For those persistent rust spots that dare to tarnish your gate’s beauty, white vinegar is your secret weapon. It will dissolve rust and bring back the gleam to your iron gate or metal fencing.
A Soft Cloth
Your soft cloth is your gentle ally in this quest. It will clean your gate, wiping away dirt and grime without causing any harm to its surface.
A Wire Brush
When dirt and debris have dug in their heels, the wire brush steps in as the grime gladiator. It will vanquish cobwebs, stubborn dirt, and tenacious rust.
Warm Water
Warm water is like a soothing bath for your gate. It will rinse away the remnants of dirt, leaving your gate refreshed and clean.
A Spray Bottle
The spray bottle is your precision instrument, allowing you to apply cleaning solutions with accuracy, ensuring no spot is left untouched.
Dish Soap
When your gate faces greasy adversaries, dish soap partners with soapy water to cut through the toughest grime and leave your gate spotless.
Clean Water
Clean water serves as a refreshing rinse, washing away the remnants of cleaning solutions and grime to give your gate a pristine finish.
Detergent
Detergent is the final touch that adds a glossy shine to your gate. It’s like the finishing stroke of a masterpiece, making your gate look as good as new.
Paper Towel
To add that extra sparkle and polish to your gate, the paper towel steps in as the perfect polishing partner, ensuring your gate shines brightly.
Cleaning and Polishing Your Gate
Step 1: Assess the Situation
Before you dive into any cleaning spree, take a good look at your gate. Check for rust, stains, and stubborn grime. If it looks like a war zone out there, don’t fret! We’ve got the artillery to win this battle.
Step 2: Remove Surface Grime
Remove any debris or loose dirt clinging to your gate. A wire brush works wonders in this regard. Give your gate a good brushing-down, getting rid of any lingering dust or pesky cobwebs.
Step 3: Apply Soap
Prepare a concoction of soapy water using your dish soap. Dip your soft cloth into the soapy mix and start wiping down your gate. The soapy water will break down the dirt and grime, allowing you to wipe it away effortlessly.
Step 4: Rust-Busting with Vinegar
If you spot signs of rust, mix white vinegar with warm water, creating a rust-busting elixir. Dip your cloth into this solution and apply it to the rusted areas. Let it sit for a few minutes, then give it a good scrub with that wire brush.
Step 5: Rinse and Shine
Rinse your gate thoroughly with clean water. A trusty garden hose does the trick nicely. Make sure all soap residue, rust, and grime are washed away, leaving your gate gleaming in the sun.
Step 6: The Final Touch
To give your gate that extra sparkle, mix a bit of detergent with water in a spray bottle. Spray it onto your gate and wipe it clean with a soft cloth or paper towel. This will leave your gate looking as good as new.

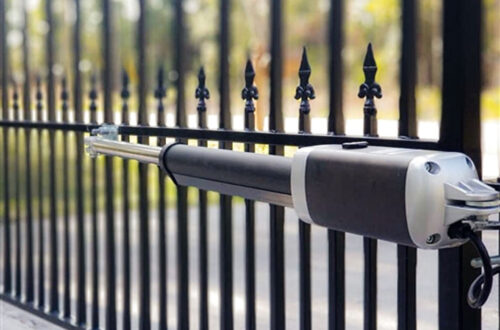
Lubricating Hinges and Moving Parts
If you’re one of the lucky folks with an automatic gate, you’ve got a few more steps to keep it humming along.
Step 7: Tidy the Tracks
Check the tracks your automatic gate glides along. Dirt and debris can cause obstructions and unpleasant noises. Use a soft cloth to clean the tracks and ensure smooth operation.
Step 8: Lubricate the Hinges
Don’t let your gate squeak like a rusty door. Apply a little grease to the hinges, so your gate opens and closes quietly and smoothly. This will also help put less stress on your automatic gate opener.
Inspecting for Damage and Repairs
Step 9: Electrical Sanity
Inspect the electrical components of your automatic gate. Ensure that all wires are intact and connections are secure. Any related content issues should be addressed promptly to avoid gate malfunctions.
Keeping It Regular
Now that your gate is sparkling, it’s time to talk about maintenance frequency. Regular cleaning and iron gate maintenance are essential to keeping your entrance in top-notch shape.
- Monthly Check-Up: Take a few moments each month to inspect your gate. Remove any dirt or dust accumulation, and address minor stains promptly.
- Quarterly TLC: Every three months, give your gate a more thorough cleaning, following the steps outlined earlier. This will help prevent rust and keep your gate looking pristine.
Special Considerations
Sometimes, your gate may face unique challenges, such as stubborn stains or contamination.
Stubborn Stains
For particularly stubborn stains, like bird droppings or tree sap, try applying a mixture of vinegar and baking soda. Let it sit for a few minutes, then scrub it away. This dynamic duo works wonders on even the toughest stains.
Preventative Measures
Maintenance isn’t just about cleaning up after the battle; it’s also about fortifying your defenses to prevent future skirmishes. Consider these preventative measures to ensure your gate stands strong and beautiful for years to come.
Apply a Protective Primer
Think of a protective primer as your gate’s suit of armor. Before rust and corrosion even have a chance to think about invading, apply a high-quality primer to the surface of your iron gate. This extra layer will act as a barrier, shielding your gate from the elements and the ravages of time.
Invest in a Protective Coating
To take your gate’s defense to the next level, invest in a protective coating specifically designed for iron surfaces. These coatings are like magical shields that repel rust and corrosion with ease. Not only will they guard against environmental factors, but they’ll also maintain the gate’s pristine appearance. At ALEKO, we apply powder paint to our galvanized steel gates to improve corrosion resistance and protect them from the elements over time. Thanks to this Duplex System, your steel gate can resist a wide range of rust, corrosion, and weather-related damage.
Regularly Inspect and Maintain
The best defense is a good offense. Regularly inspect your gate for any signs of wear and tear, rust, or damage. Address any issues promptly to prevent them from escalating into major problems. A stitch in time saves nine, and a touch-up now can save your gate from costly repairs later.
Keep It Clean
As we’ve already discussed in detail, regular cleaning is essential. It’s not just about aesthetics; it’s about preventing the buildup of grime and dirt that can lead to rust and damage over time. Make gate cleaning a part of your routine maintenance schedule.
Check Electrical Components
If you have an automatic gate, inspect the electrical components periodically. Ensure that wires are intact, connections are secure, and any related content issues are resolved promptly. A well-functioning electrical system is crucial for the gate’s reliability.
Seek Professional Help
When in doubt or if you notice any significant issues, don’t hesitate to seek professional assistance. An experienced gate maintenance expert can assess your gate’s condition, provide specialized care, and perform repairs or upgrades as needed.
Conclusion
Congratulations! You’ve now mastered the art of gate cleaning and iron gate maintenance. Your entrance is not just an entry point; it’s a statement, a first impression, and a source of pride. Regular cleaning and care will ensure that your gate stands tall and beautiful for years to come.
Remember, gate cleaning isn’t just about aesthetics; it’s about preserving the integrity and functionality of your gates. So, grab your soapy water, white vinegar, and that wire brush like the gate warrior you are, and keep your entrance shining and welcoming for all who pass through.